
Large language models (LLM), which are behind Generative AI solutions, have increased efficiency in the processing of research and analysis tasks. With the help of LLM multi-agent systems (MAS), we can automate steps such as data collection, information extraction and analytical tasks such as predictions. In combination with serverless cloud computing, large amounts of data can be processed very cost-effectively and on demand.
In this tutorial, we will learn how to use the Crewai library to set up a customized multi-agent research tool. Serverless Azure Functions will be used to deploy this engine and run it in an automated way according to our needs. If you want to get an introduction to multi-agent systems and how they interact with serverless computing, you can take a look at the related context post here.
Our toolset
GenAI models, such as OpenAI’s proprietary GPT series or open source options like Mistral, are often the backbone of multi-agent systems. These models provide the reasoning and communication capabilities that make agents effective. Whether you are using a local model or one accessed via an API, choosing a strong base model is critical. OpenAI’s GPT models are great for tasks that require function calls or working in different contexts. Small open source models (available on platforms such as Hugging Face) can call functions as well. However, they often do not offer the reasoning capabilities to adapt to changing or complex task environments. Keep these trade-offs in mind before deciding on a model. This still holds true, even though the advances around Deepseek R1 have made running local models much more efficient and cost-effective.
In this tutorial, we use OpenAI’s GPT API, but local models are also supported by the framework we use. If you are familiar with concepts such as system prompts and fine-tuning LLM models for specific behaviors this is very helpful. However, familiarity with these concepts is not required as the Crewai framework allows you to configure agent behavior with natural language commands in a user-friendly way.
What You’ll Need
- CrewAI: Crewai is a Python-based open source library for building multi-agent systems. It is the most widely used framework for this purpose. If you are looking for a comparison of frameworks, you can read my context post. In this tutorial, we will use Crewai to create serverless Python functions that allow our agents to dynamically perform various tasks such as online searches. We’ll cover installation and setup later. If you want to familiarize yourself with the framework, I recommend this video (and the entire series) by Maya Akim.
- Azure Account: The following tutorial assumes that you have set up an Azure account. If you need instructions on how to do this, read the beginning of this tutorial to create your account and configure the basics.
- Azure Functions: A Microsoft Azure cloud service that provides serverless computing power for running code snippets on demand in a variety of languages, including Python. It allows you to deploy lightweight, scalable functions that host your agents and execute specific tasks on demand. We will set up and interact with Azure Functions via Visual Studio Code as follows.
- Visual Studio Code (VS Code): Although any integrated development environment (IDE) will do, I recommend VS Code because of its seamless integration with Azure. It has pre-built plugins that simplify deployment, debugging and other operations. Follow the initial instructions in this tutorial by John Savill to set up VS Code, required plugins and the connection to your Azure account. The introduction to the basic types and components of Azure Functions is not required, but can help you better understand the upcoming implementation.
Inner workings of multi-agents systems and applying guardrails
Many MAS frameworks take a similar structural approach to orchestrating automation with LLM. The Crewai library takes a three-component approach:
- Agents serve as the core of the system, each defined by a role and a goal. The role is a comprehensive description of the agent’s purpose, while the goal describes what the agent is supposed to achieve. By including a backstory that describes the agent’s skills and focus, agents can be tailored to perform specific tasks with specific characteristics. For example, an agent with a backstory that emphasizes financial analysis may approach problems with a numerical and methodical mindset.
- Tasks are the specific instructions that the agent must follow to achieve its goal. To create clarity and avoid unwanted behavior, task descriptions should be short and precise. Within the task description, use “guardrail” instructions that set limits on the agent’s behavior (see next section). In addition, specifying the expected output format and methodology will ensure that the agent’s results meet the predefined standards. For example, if the task involves retrieving data, a structured output format such as JSON can be specified as required. To achieve better results, you can follow basic prompt engineering techniques when customizing an LLM.
- Tools are the final piece of the puzzle, allowing agents to perform actions beyond their capabilities inherited from the large language model (LLM). These tools consist of reusable code created by developers that allows agents to perform custom tasks. When integrating tools, it is important to clearly define their inputs and outputs. Lack of clarity in the use of tools can confuse agents and lead to errors or inefficiencies. To ensure that agents use the tools correctly, it is helpful to explicitly mention the tools in the context of the task description.
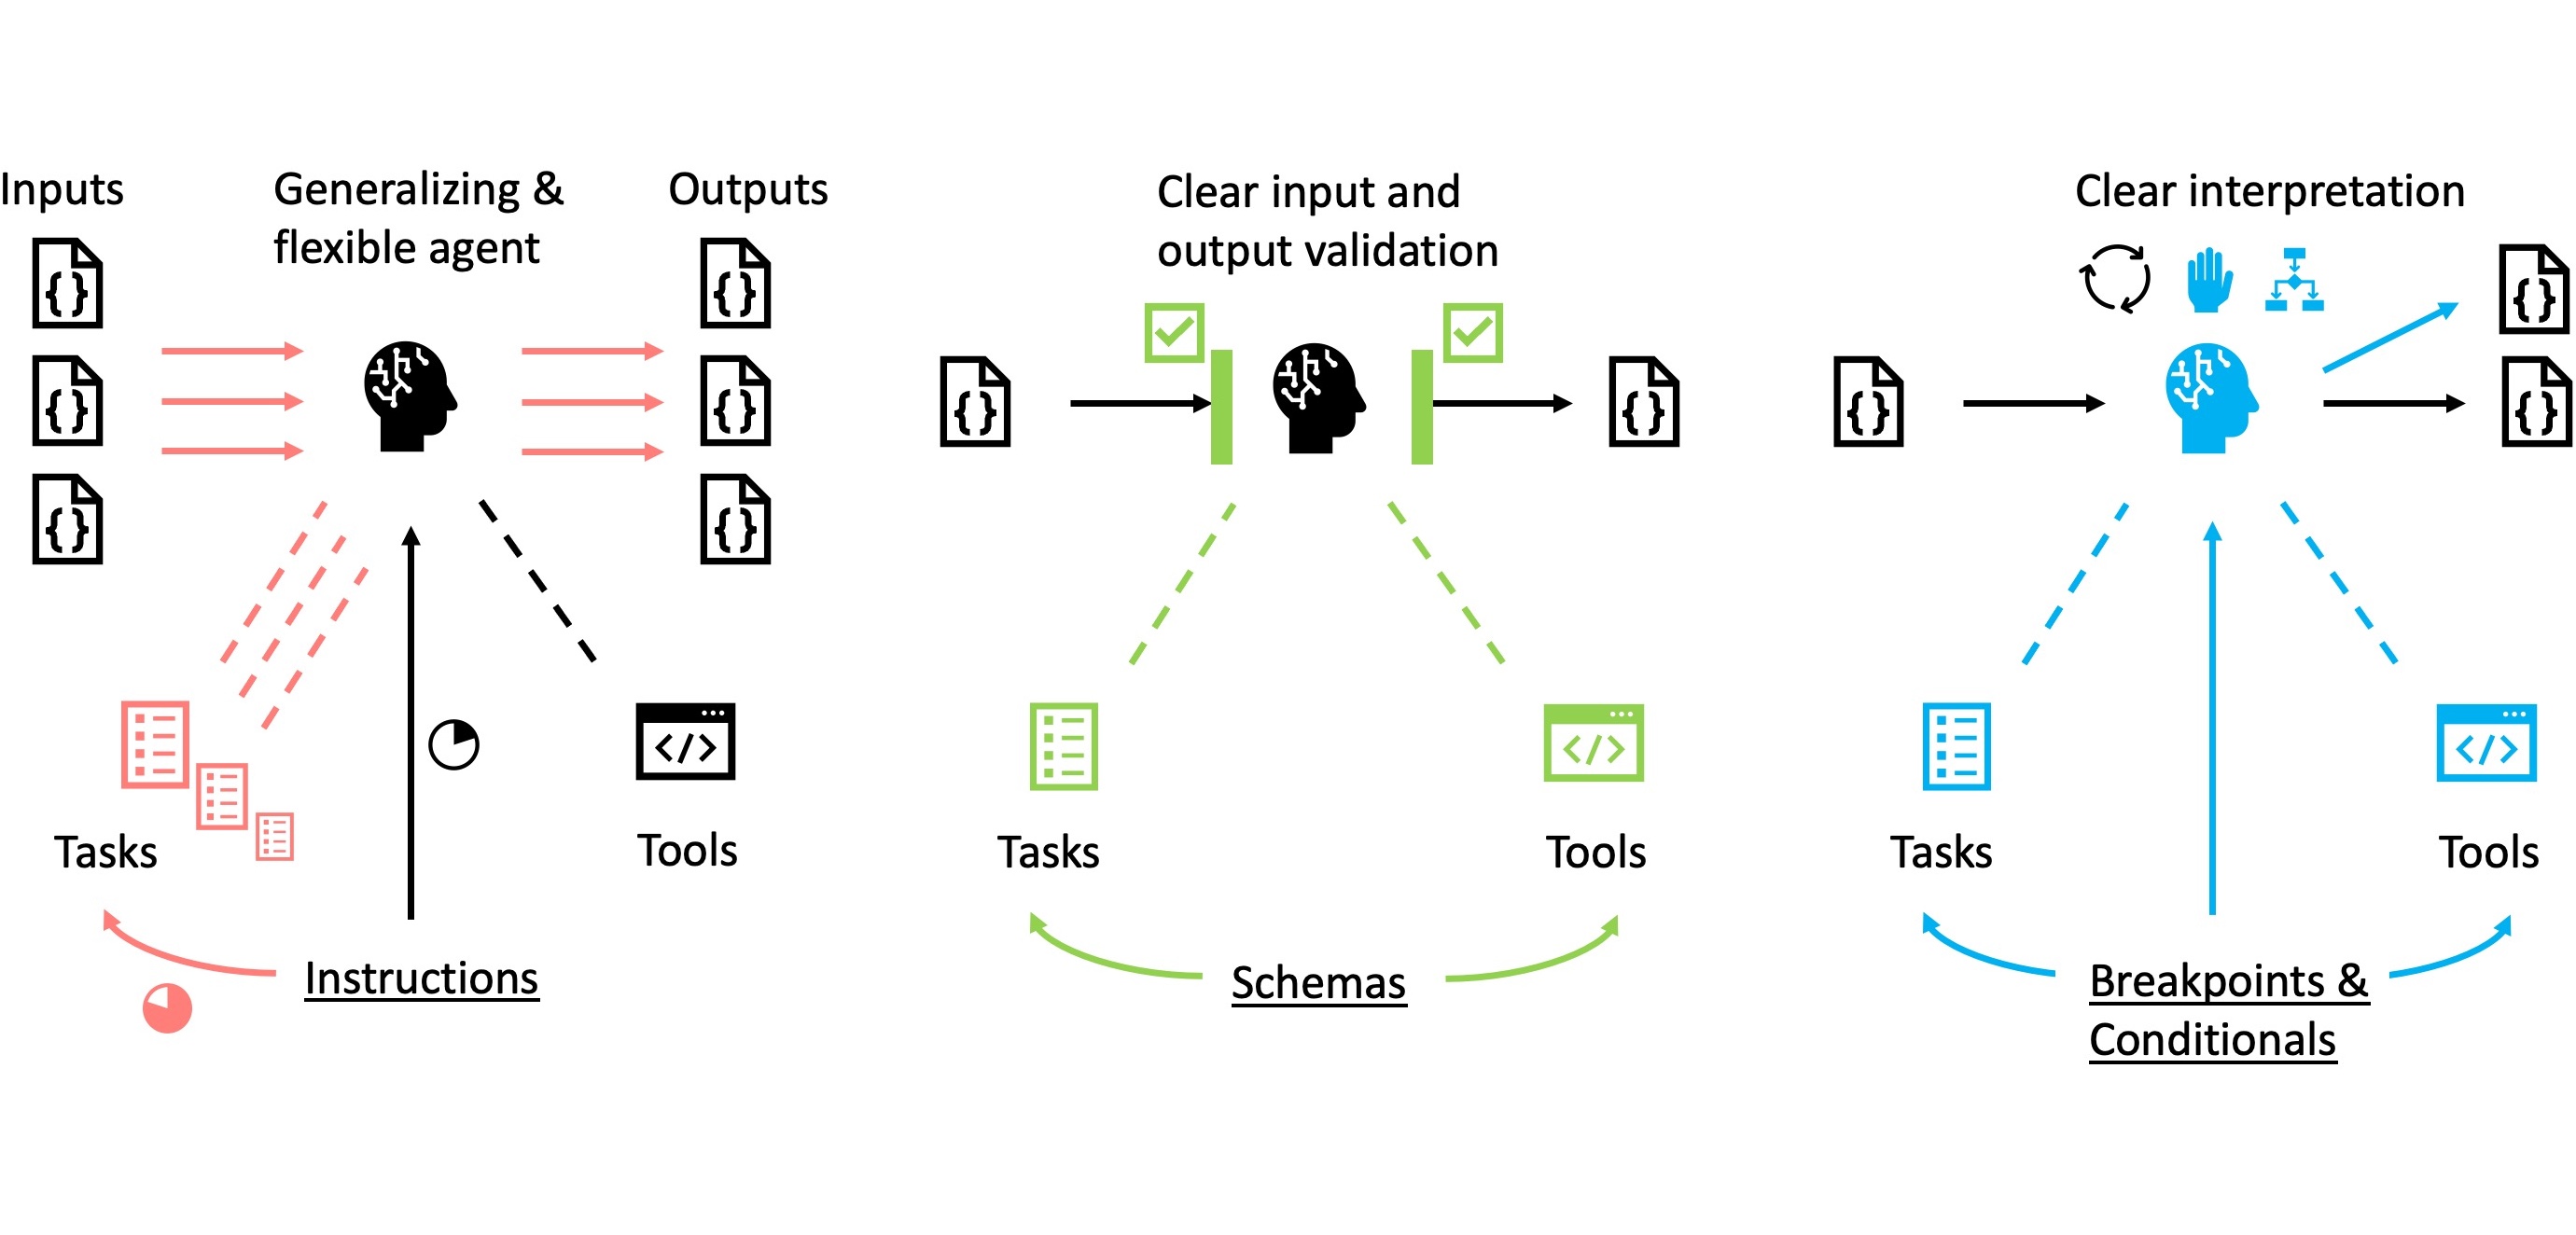
When developing multi-agent systems, it’s important to strike a balance between flexibility and clarity by using some guardrails to effectively guide agent behavior. Here are three that I have found particularly useful when working with Crewai:
- At first glance, it seems intuitive to define everything at the agent level (e.g. assigning general responsibilities such as “you do this”). However, it is more effective to focus on the definition of tasks. Tasks should contain the bulk of the instructions so that agents remain flexible and reusable for a variety of contexts.
- Agents can interpret input variables and try to solve tasks by trial and error if they are not given clear instructions. While this flexibility can be beneficial, it often leads to inefficiency or errors. To avoid this, you should explicitly define input variables and transformation requirements using schemas at tool and task level. Schemas not only structure the data, but also facilitate collaboration between agents, people and tools and ensure consistency throughout the system. Have schemas piqued your interest? Then get to know them better in this blog post.
- In cases where tasks require complex data transformations or uncertain decisions, conditional commands or breakpoints should be built in (in the task, tool and agent specifications where appropriate). These fallback options limit the agent’s scope for improvisation. They reduce the likelihood of errors and still allow the agent to cope with unforeseen scenarios. This combination of clear instructions and controlled flexibility utilizes the agent’s problem-solving capabilities while reducing risk.
Some words of caution before we dive into the hands-on part:
- First, it is important to emphasize that mission-critical tasks should not rely on machine learning models that lack transparency in their operation. While LLMs offer powerful capabilities, they are still unpredictable to varying degrees, even when control parameters like temperature are adjusted to encourage controlled behavior. You will experience this yourself if you repeat the following steps of the tutorial, but you will get different results than shown here. This is made particularly difficult by the fact that OpenAI does not offer any Seed settings for its reasoning models. This unpredictability becomes even more pronounced when multiple agents communicate with each other. They process different inputs and attempt to adapt to different tasks, creating significant opportunities for improvisation. The precision and deterministic processing of tools is therefore key to the predictability of the MAS output (see context post).
- Secondly, the rapid development in the field of machine learning requires vigilance. Libraries and packages often introduce groundbreaking changes or make older solutions obsolete. To ensure the long-term viability of your system, it is essential to freeze the system state and schedule regular updates accompanied by thorough debugging. Proactive maintenance and robust version control procedures are key to minimizing risk. This will keep your system up to date and ensure that it remains functional and adaptable in a rapidly changing environment.
Assemble your crew! Let’s build a custom research and prognosis engine
Predicting how a particular factor will develop in the future is inherently difficult. A well-designed model that calculates the target value from the input variables is essential. But the process is often complicated by a lack of historical input data and the presence of significant uncertainties. Conducting research to fill these gaps and repeatedly recalculating values for adjusted inputs is not only time-consuming but also tedious. This is an ideal scenario to delegate to an automated multi-agent system that can efficiently perform the data collection, iterative calculations and adjustments, streamlining the entire process.
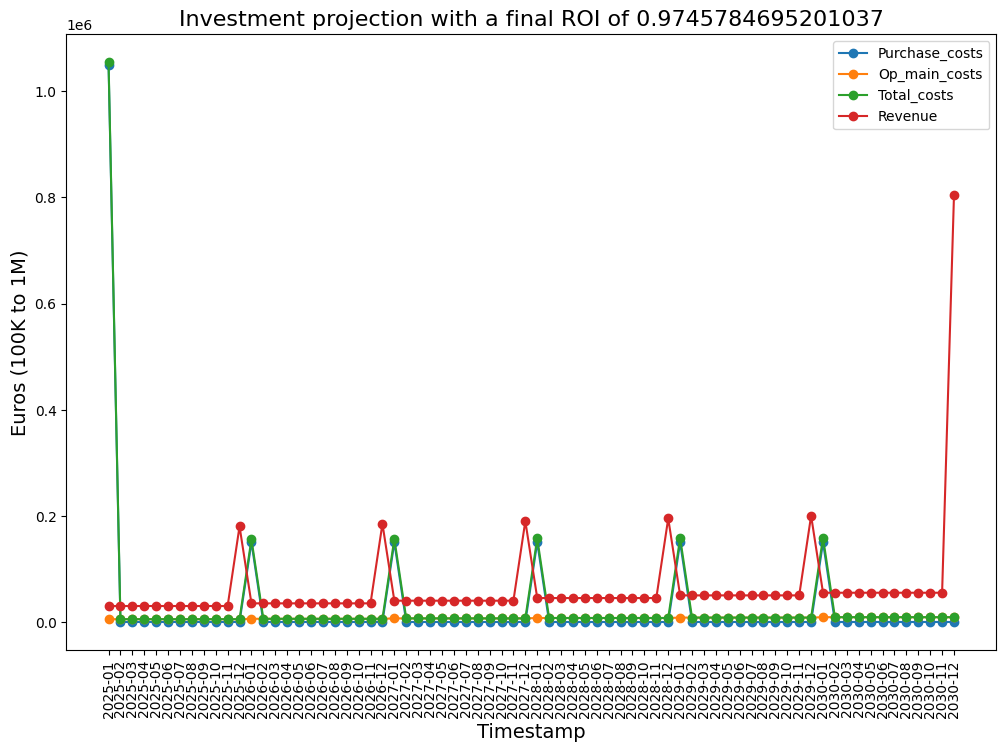
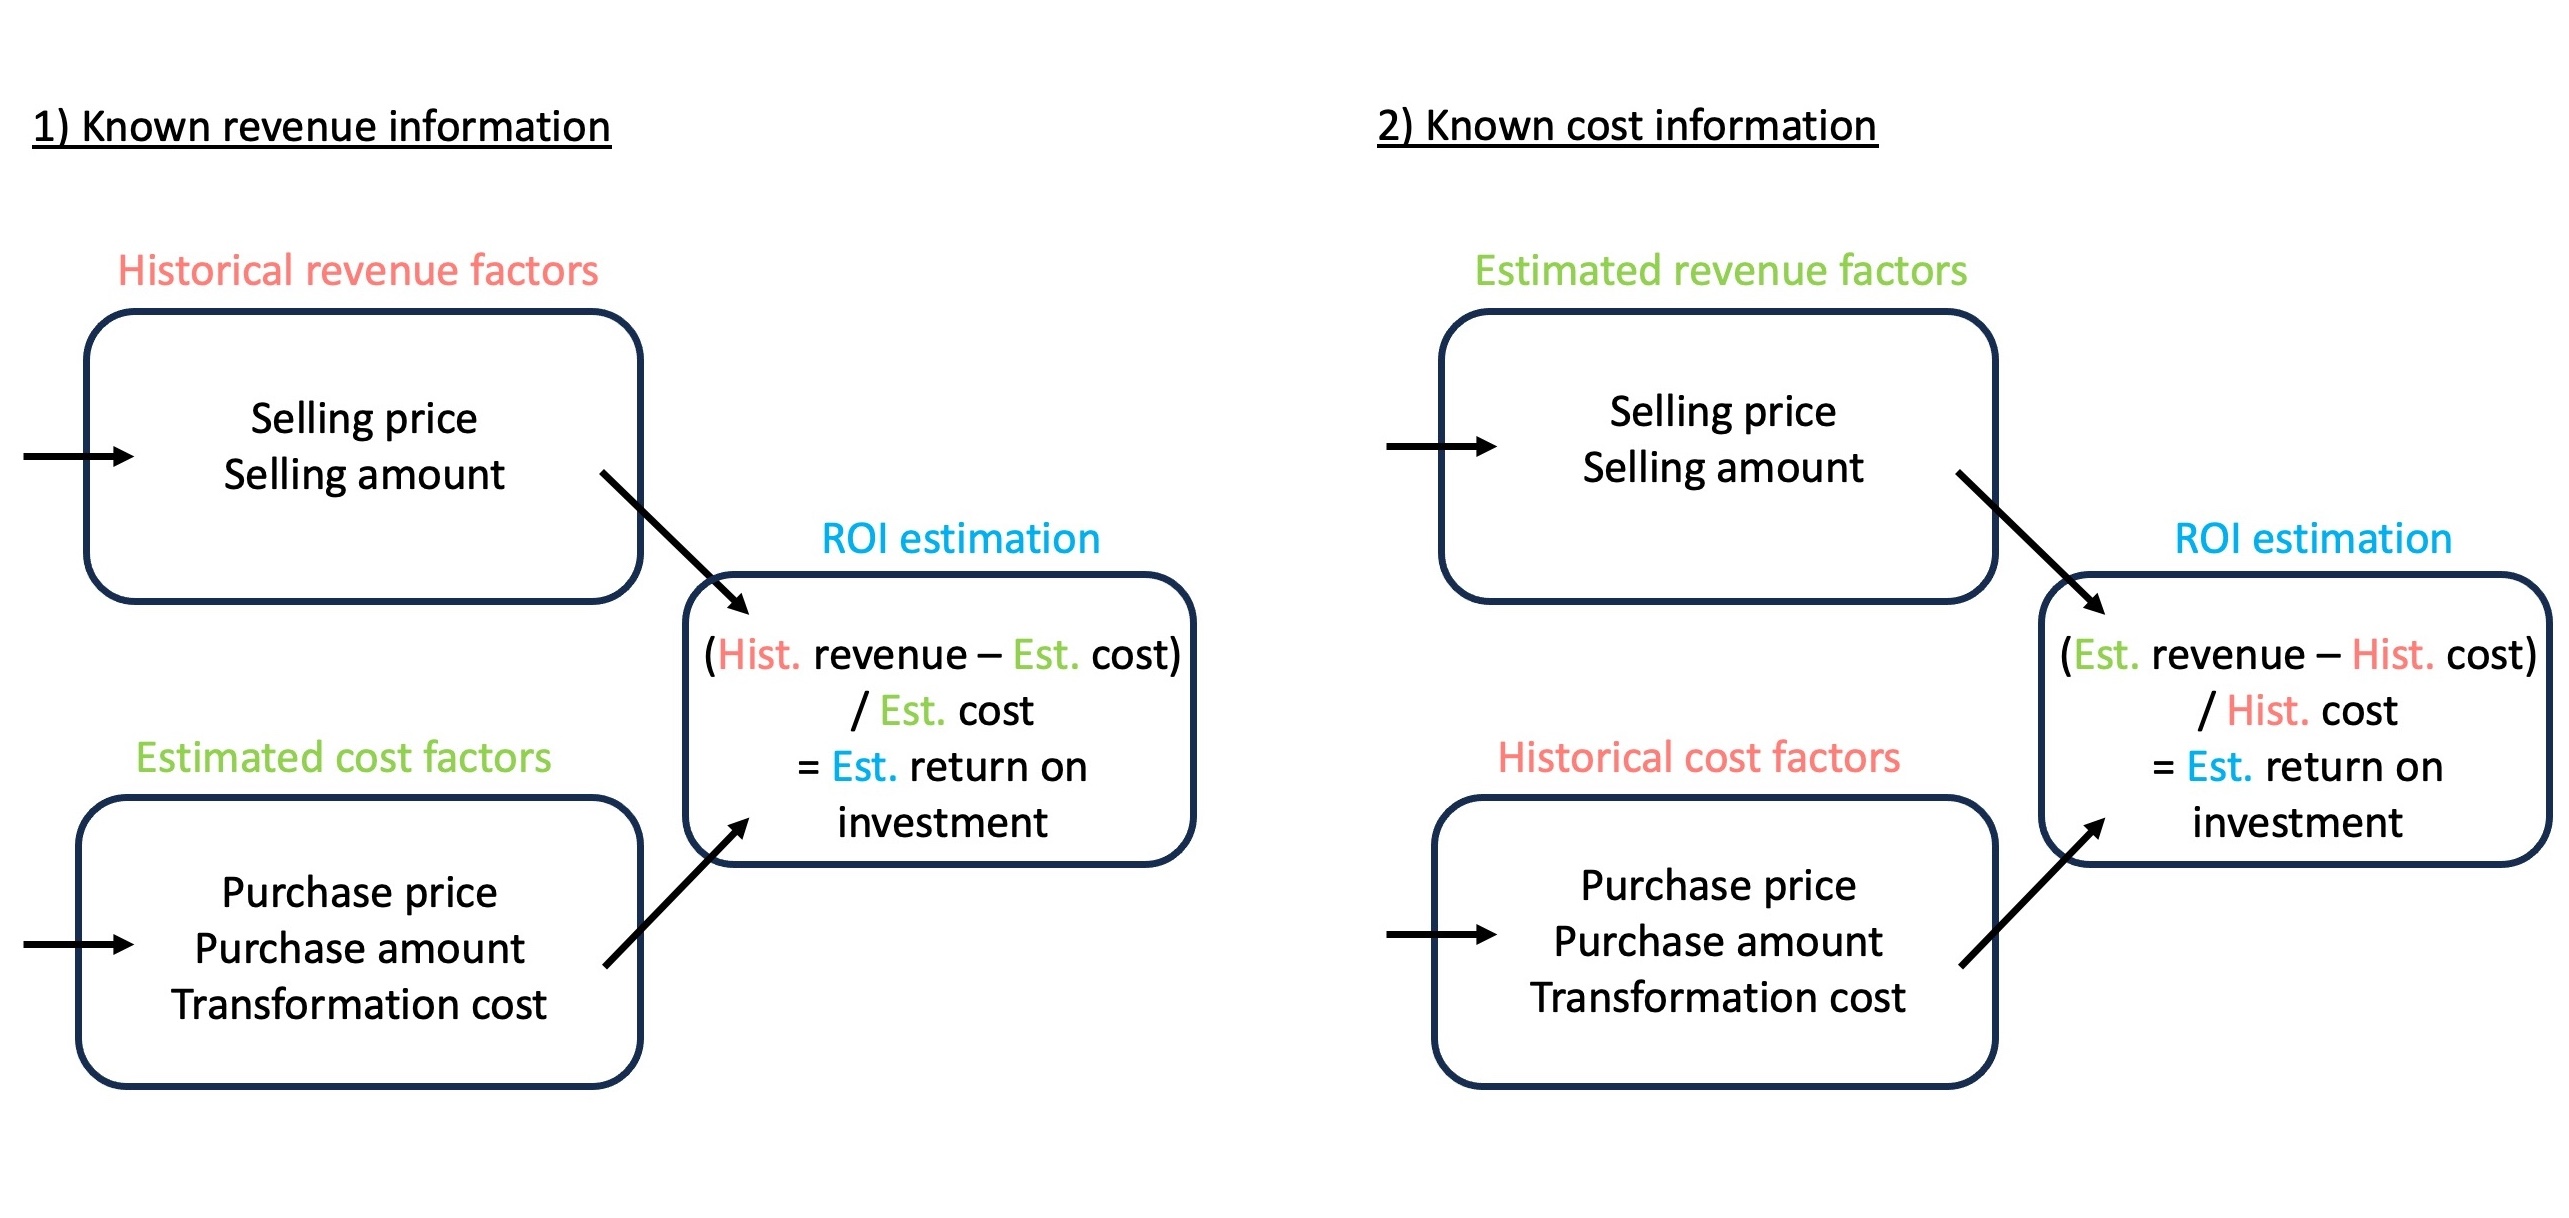
In the business world, it is common for only incomplete data to be available. For example, either cost or sales indicators are available while the other side remains unknown. However, in order to make informed decisions, it is crucial to approximate all factors and calculate performance metrics like the return on investment (ROI). Our goal is to develop a MAS that is able to collect, estimate and analyze time series data for both costs and revenues. By automating this process, agents can continuously incorporate the latest developments, calculate new ROI estimates and visualize the updates in a user-friendly way. This provides an up-to-date overview of the potential performance of the investment and its development.
Step 1: Basic agents, tasks and tools in a local environment
To start implementing the basics for our MAS, we will set up a simple sequence with two agents and two different tasks. This initial setup will use predefined Crewai tools without customization, focusing on a simple workflow: collecting, packaging and storing data. The following instructions summarize all actions that can be followed in detail with the video at the end of the section.
To start, we need to set up a project environment, API access and a basic Python script for your agents.
- In VS Code, we use the built-in project creation setting to create an Azure Function project to simplify the setup of the environment. We then add the required packages such as
azure-functions, crewai and langchainto the requirements.txt file. You can use the frozen package versions from my tutorial repository as a guide. To install the packages, use the pip install command as shown in the video. - Log in to OpenAI if you don’t have an account yet. To use the OpenAI API, we need to set up a small credit for each request. But a small amount of 5€ is more than enough for the cent amount we will spend during this whole tutorial. After that, you can generate and get an API key from the API key section in your OpenAI account dashboard.
- We carry out a similar but free procedure for the Serper API, which allows us to query Google. After registering, you will receive an API key that enables 2500 free queries per month.
- Once you have saved the API keys in the environment file (.env), you can set up the agents in a single crew.py file as follows. Take some time to look at how tools, agents and tasks have been defined. Precise descriptions in natural language for agents and tasks are important, as described in the previous section.
import os
from dotenv import load_dotenv
load_dotenv()

from crewai import Agent, Task, Process, Crew
from crewai_tools import FileWriterTool, SerperDevTool

######################### Initialization ###################

api = os.getenv("OPENAI_API_KEY")

######################### Tools  ###########################

web_search_tool = SerperDevTool(
    n_results=20
)
file_writer_tool = FileWriterTool(directory='./output')

######################### Agents ###########################

researcher = Agent(
    role="Researcher",
    goal="Find all monetary information for a given product category and year",
    backstory="""
    You are an expert in identifying relevant monetary factors and their numerical values for a target timeframe.
    """,
    verbose=True,
    allow_delegation=True,
    tools=[web_search_tool]
)

analyst = Agent(
    role="Analyst",
    goal="""Generate an month-by-month timeseries from the provided historical data.""",
    backstory="""
    You specialize in timeseries transformation and mathematical models to fill gaps in historical data.
    """,
    verbose=True,
    allow_delegation=True,
    tools=[file_writer_tool]
)

######################### Tasks ###########################

task_research = Task(
    description="""
    Search for costs associated with owning an e-bike in the year 2024 ONLY
    using the query: 'e-bike ownership cost breakdown 2024'.
    Extract all data that can be used to build any kind of timeseries, including
    timestamps or seasonal indicators. You only hand over a result that contains numerical
    cost values with associated timestamps or seasonal indicators.
    """,
    expected_output="Collection cost information for the year 2024.",
    agent=researcher,
    human_input=False,
)

task_analyze_deposit = Task(
    description="""
    Analyze the information given by the researcher and create timeseries for each cost factor with one value per month.
    If you do not have enough datapoints you can use the ARIMA method to create estimates with the datapoints you have.
    In the end you should have one value per month for each cost factor.
    From such create single JSON file that contains all timeseries.
    """,
    expected_output="A JSON file with timeseries written to the folder named output.",
    agent=analyst,
    human_input=False,
)

######################### Execution ###########################

my_crew = Crew(
    agents=[researcher, analyst],
    tasks=[task_research, task_analyze_deposit],
    verbose=True,
    process=Process.sequential,  # Sequential process will have tasks executed one after the other and the outcome of the previous one is passed as extra content into this next.
)

result = my_crew.kickoff()

print("######################")
print(result)
Start the MAS process by executing the python crew.py command in your activated virtual environment. In the logs, you can observe how the agents make their considerations step by step. After completion, open the result in the output folder. Great! You have set up your first basic MAS automation. Now let’s use these building blocks for the use case mentioned above.
Step 2.1: Process design and customized tools
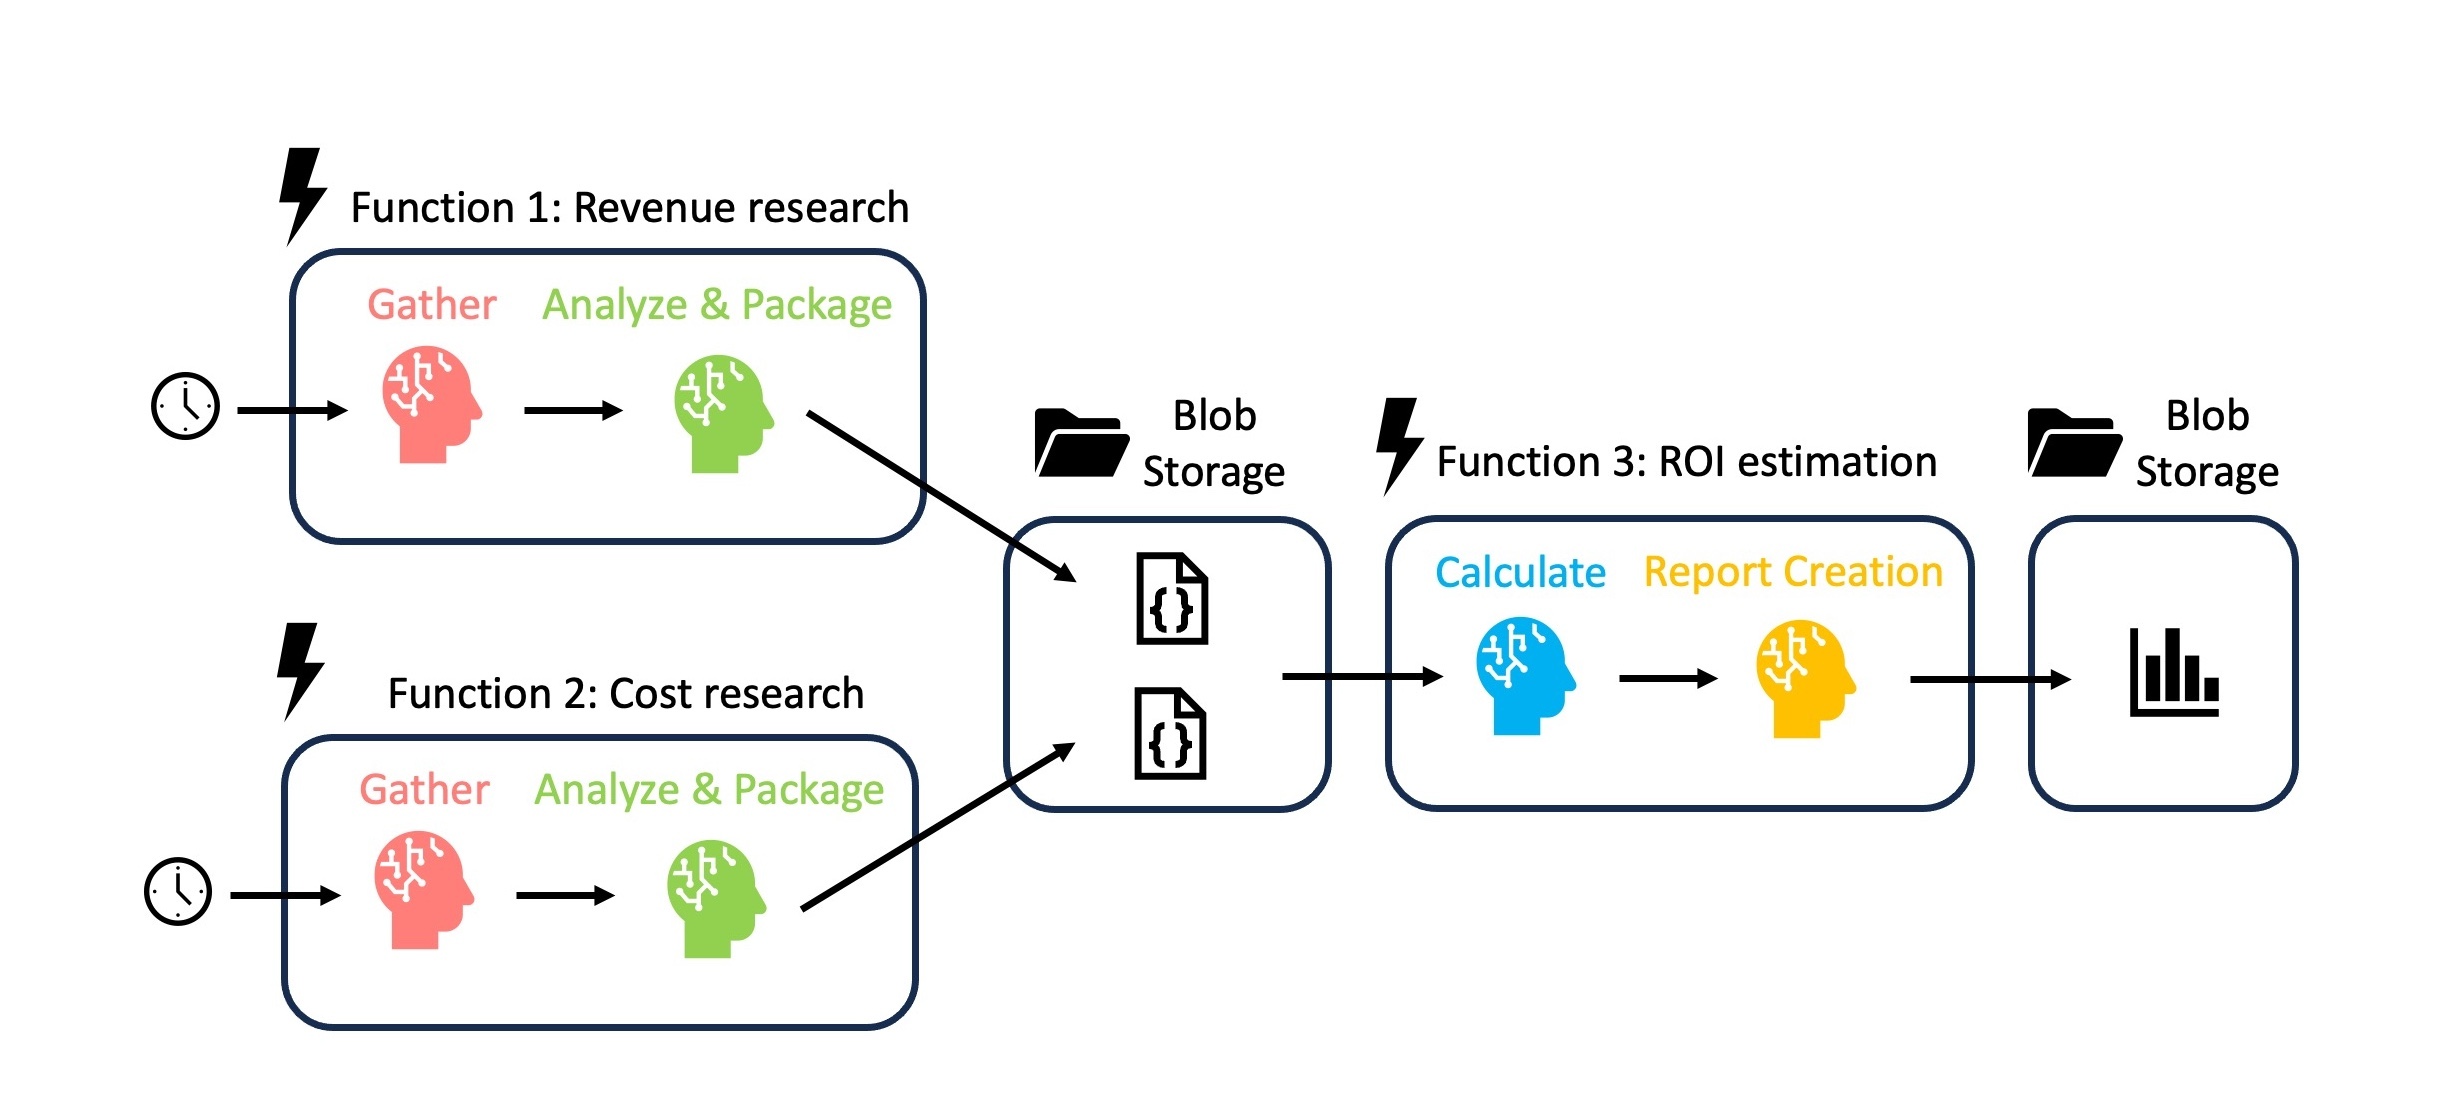
Collecting, structuring and storing data is great, but we should add another layer that processes raw data to gain the desired insights. Therefore, we will extend the functionality by introducing two new agent types for calculation and reporting. The calculation agent will get a custom tool to perform the ROI calculations mentioned in the introduction. We also plan to not only examine costs as in the previous example, but also revenue-related data. Conveniently, we can reuse the research and analysis agents for both use cases if we define them generically enough. We only need to assign them two new tasks.
With all these different agents, it is best to design a concrete process to guide our implementation. In doing so, we should keep in mind the Azure cloud infrastructure in which we ultimately want to deploy our MAS. The simplest trigger for activating an Azure Function is a time-based trigger. This allows us to run the two data collection processes independently on a fixed schedule, while the calculation and reporting process can be decoupled from data delivery. Such “divide and conquer” strategies are very helpful in MAS design (see context post).
You can find all the relevant code in the crew.py file in the project repository. While you can basically clone/copy it to proceed to the next steps, let’s take a quick look at parts of the most customized tool we will give to the calculation agent. The focus here is on the detailed schema used in the input definition of the function. This gives the agent very clear instructions on what is needed for the ROI calculation to avoid misunderstandings. Such schemas should be used for any tool that is to function reliably when used by agents.
class ROIInputSchema(BaseModel):

    Purchase_costs: List[float]
    Purchase_dates: List[str]
    Operational_and_maintenance_costs: List[float]
    Operational_and_maintenance_dates: List[str]
    Service_revenue: List[float]
    Service_revenue_dates: List[str]


    class Config:
        json_schema_extra = {
        ...
        }

class ROIcalculator:
    @tool("ROIcalculator", args_schema=ROIInputSchema)
    def calculate_roi(
        Purchase_costs: List[float],
        Purchase_dates: List[str],
        Operational_and_maintenance_costs: List[float],
        Operational_and_maintenance_dates: List[str],
        Service_revenue: List[float],
        Service_revenue_dates: List[str],
    ):
        """
        Calculate the Return on Investment (ROI) using provided cost and revenue time series data.

        Parameters:
            Purchase_costs (List[float]): List of purchase costs.
            Purchase_dates (List[str]): Corresponding dates for purchase costs.
            Operational_and_maintenance_costs (List[float]): List of summed up operational and maintenance costs.
            Operational_and_maintenance_dates (List[str]): Corresponding dates in %Y-%m-%d format for those costs.
            Service_revenue (List[float]): List of revenue generated from service.
            Service_revenue_dates (List[str]): Corresponding dates for service revenue.

        Returns:
            dict: A dictionary *directly matching* the MultiSeriesPlotInput schema:
                  {...}
        """
        ...

        return {...}
Step 2.2: Azure Functions wrapping and testing
To execute the processes according to our plan, we will wrap an Azure Function around each of the Crewai workflow sequences.
Use the function_app.py template in the repository and adjust it to your liking. The @app.schedule decorator defines a timer trigger that schedules a regular execution with cron syntax. For test purposes, we can start with an execution every minute for a workflow sequence. In Azure, we set up the required storage accounts and containers to which we want to write and from which we want to read. Once set up, we can copy the connection strings from the settings to the local.settings.json so that the functions can use them to access the storage.
Since we have previously defined all relevant Crewai components in crew.py, we only need to import them and assemble the crews for each workflow sequence. Now we have three different functions for all three sub-processes. They are only executed at the required times and retire afterwards, which makes the use of computing resources very efficient. However, before we move on to the actual cloud deployment, we can test whether everything is working by executing the func start command. The initial setup can take 3-5 minutes. After that each execution is much faster. Use this responsive, local testing method before deployment to avoid more time-consuming troubleshooting in the Azure cloud environment.
Step 3: Cloud deployment to Azure Function App
While we have already tested our MAS locally in combination with a blob storage, we still need to set up an Azure Function App that will host it online. We’ll opt for a Flex Consumption Plan, the newer pay-as-you-go option in Azure with more performance and storage options. Let’s go through some important settings. Choose the Python runtime stack that corresponds to your previous project version, in our case 3.11. The instance size of about 2 GB is fine, but also required as we are working with ML libraries with quite large environment installations. In the storage settings, you can reuse the previous storage account (provided you have set it up with hierarchical namespace). For this proof-of-concept tutorial, we will allow public network access so that we can deploy the feature from our local network without additional network control. In professional/productive settings, this option should always be disabled so that your applications are securely isolated on a private network!
Once the Azure App Service deployment is complete, we navigate to the ->Settings->Environment Variables tab to make some final adjustments. Both the local.settings.json and the .env file will ultimately not deployed, so we need to set up their variables here. The deployed functions need these to work as tested and can access them through these cloud-specific settings. If you deploy without environment variables in place, you will find that the deployment was successful but no functions are displayed and enabled due to the missing values.
After you’ve taken care of all that, it’s time to deploy the MAS into the Azure App Service. Using Visual Studio Code with Azure plugins simplifies this process to a few simple steps. On the dedicated Azure tab, we select the function we want to deploy to Azure. This takes us through the selection of the existing Function App and we’re ready to go. If there are any issues, you should find them in the logs. Once successfully deployed, the three functions for our three MAS workflows should be listed in both VS Code and Azure. Let’s take a look at the blob storage and see how the JSONs from the research processes appear. After some while we should also find the graph image from the final ROI reporting process. Congratulations, you have successfully set up a MAS research and prediction engine that is highly cost-effective! Remember to pause or delete the function app when you no longer need it, otherwise it will continue to run.
Of course, you can now start to customize this template with new task and agent definitions to suit your needs. Or you can create entirely new tools and orchestration workflows for completely different automation requirements. There are a lot more potential use cases for MAS automation. With the insights from this tutorial and the context post you should have a good starting point for testing further practical applications.